Painting Like the Old Master's
Old Master's Technique
with acrylics and
Matte Medium to thin your paint (no water ever!)
with acrylics and
Matte Medium to thin your paint (no water ever!)
The deep, rich, velvety darks were
achieved by Masters such as Rembrandt by
applying many layers of transparent paint.
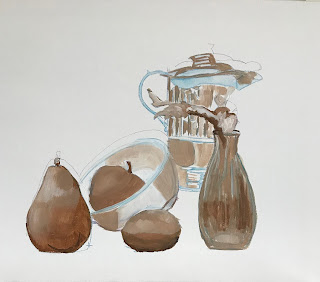
I started by lightly painted an under painting. I used burnt umber. I mixed three color piles of paint- light, dark, and most darkest. When painting this layer, I focused on the details of my painting reference checking for the light and dark areas.
This layer will determine the proportion of light and shadow in your composition. When painting this underpainting the paint should be almost as thin as watercolors. However, there are always exceptions to the rules - I chose to paint mine slightly thicker than watercolors because it is my hope that my underpainting will show through my layers of transparent paint giving almost an illumination.
Sketch your picture reference onto your canvas. I have found that using pastel chalk to sketch works best for me. The pastel will mix with your paint easily. If you have an occasional pastel mark showing it actually will add to your painting.
Next paint your picture making sure to paint the lights, darks, and most dark areas. Try to blend each area into one another so that there are no hard lines. Oh by the way, I always mix my acrylics with a matte medium NEVER WATER, because the water dilutes the stickiness of the paint to your canvas. Use a matte (of if you prefer glossy) medium to mix with your acrylics paint. However, this can be quite tricky - too much medium will cause your paint to be tacky, so start off with small dabs of the medium in your paint. If you find it is not moving (flowing) as you like add another small dab.


You can view my completed painting in another post called Rainy Day Still Life Painting and Abbreviated Rainy Day Still Life Painting.
This layer will determine the proportion of light and shadow in your composition. When painting this underpainting the paint should be almost as thin as watercolors. However, there are always exceptions to the rules - I chose to paint mine slightly thicker than watercolors because it is my hope that my underpainting will show through my layers of transparent paint giving almost an illumination.
Sketch your picture reference onto your canvas. I have found that using pastel chalk to sketch works best for me. The pastel will mix with your paint easily. If you have an occasional pastel mark showing it actually will add to your painting.
Next paint your picture making sure to paint the lights, darks, and most dark areas. Try to blend each area into one another so that there are no hard lines. Oh by the way, I always mix my acrylics with a matte medium NEVER WATER, because the water dilutes the stickiness of the paint to your canvas. Use a matte (of if you prefer glossy) medium to mix with your acrylics paint. However, this can be quite tricky - too much medium will cause your paint to be tacky, so start off with small dabs of the medium in your paint. If you find it is not moving (flowing) as you like add another small dab.

This is my still life set up that I will begin painting with color. Notice that I have painted lights, darks and darkest.
The next step is fairly easy. Paint in the complete background. Be sure to mix plenty of paint if you have a large area like I do. It is better to mix plenty of paint and have some left over than to run out and try to mix another batch the same hue.


I mix a huge batch because far too often I have run out of paint before I am finished with an area, and I can never quite match the hue again. When I am finished, I just scoop up that extra paint and put it into a container that has a cover that provides a tight seal. My experience is that saved acrylic paint like this has kept for months.

Once the paint has dried completely, I will start the next layer. This is called glazing - or painting with transparent paint. I prefer glazing. The technique is quite simple. Mix your paint color (remember to add your medium). Pull some paint aside and mix it with another squirt of medium making your paint very thin almost watery. This is called your glaze.
Glaze your objects one at a time. When each object is completely dry - put on another layer of glaze, again and again and again until it reaches the level of color you desire.
I will share my painting with you - IT IS A WORK IN PROGRESS! I did start to paint in my background. I still have to work on my objects reshaping and adding more glaze, and make some shadows and work on the drapery some. Like I said a work in progress.
Learning this technique was not only intresting but a lot of fun.
You can view my completed painting in another post called Rainy Day Still Life Painting and Abbreviated Rainy Day Still Life Painting.