ORIGINAL works of art on canvas or paper are sold on this site.

PRINTS: FineArtAmerica.com
(search: Theresa Honeycheck)

ALWAYS FREE SHIPPING WITHIN THE UNITED STATES!

BUY NOW!

Title of Art Work

Thursday, May 16, 2019

Portrait in Oils . . . . Continued . . . . Step Four

Commissioned Portrait
Oil Paints
16 x 20

Baby MayLan

Portrait in Oils - Step Four:


This is Step Four in this portrait oil painting process.  I have decided, because I want this painting as perfect as I can paint it, to take it slowly.  I work on it about 3 hours a week.  I have to be patient and let it dry enough so that adding more paint on top of other paint does not cause it to get muddy.  

THIS IS STILL A WORK IN PROGRESS - however, one more 3 hour sitting and it will be completed.  I have made that decision.  Which is a tough decision for all artists to make - when a painting is done.  

I still want to finish up the flower field, work on the eyes, and put a few highlights in the hair, and paint the sides to match the front so that the painting flows.  

So here is my Step Four:  I added contrasts in the hair tie, the dress and started the flower field.  I touched up the skin on the arms just a tiny bit so that they would move forward from baby's dress.  

I am enjoying this slow process, and learning to be patient with my painting at the same time.  


Tuesday, May 14, 2019

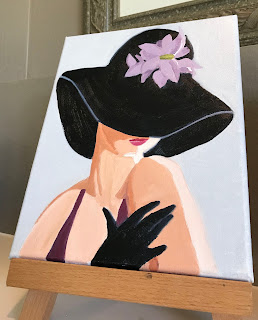
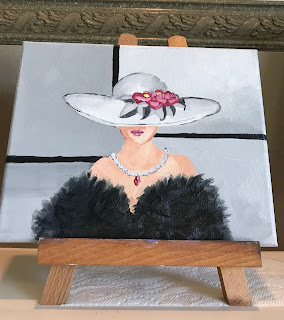
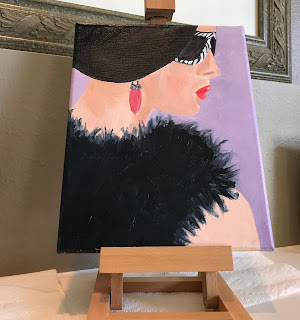
Series of Femme Fatale #1, #2, and #3 in Oil

A Series of Femme Fatales

 Painting in Oils on Canvas Board
Sides painted to make painting flow
  Ready to hang.  No frame needed.  

Size of each painting:  8 x 10 

For Sale:  $35.00 each

(This price includes FREE SHIPPING and your art work
will be bubble wrapped for protection during shipping)!

BUY NOW WITH PAYPAL - CLICK ABOVE

These paintings are shown still on their easels because they are still wet!  Straight from the studio, so I am not able to set them up to take a proper photo.  
Seems like I spend much of my time 'watching paint dry'!  But, honestly, I wouldn't have it any other way!


Femme Fatale #1


Femme Fatale #2
SOLD - on its way to Michigan!
If you would like a PRINT - FineArtAmerica.com and type in Theresa Honeycheck


Femme Fatale #3


These paintings are really cute!  They would be perfect for a guest room bath or a powder room.  


Sunday, May 5, 2019

Oil Painting . . . .

Little House On A Hill

Oil Painting on Canvas Board
(sides of frame are painted)
  Ready to hang.  No frame needed.  

Size:  11 x 14

For Sale:  $120.00


(This price includes FREE SHIPPING and your art work
will be bubble wrapped for protection during shipping)!

Buy Now - click Pay Pal button above

SOLD!  
On its way to its new Austin, Texas home!
THANK YOU AUSTIN CUSTOMER!

Purchase a Print at my Fine Art America shop by clicking on the my shop above right under Shops!
Prints as low as $42.00!


Saturday, April 27, 2019

Fun Painting - Say Cheese Please!


Say Cheese Please

 Painting in Acrylics on Canvas Panel Board
  Ready to hang.  No frame needed.  

Size:  16 x 20

For Sale:  $100.00


(This price includes FREE SHIPPING and your art work
will be bubble wrapped for protection during shipping)!

BUY NOW WITH PAYPAL - CLICK ABOVE

Purchase a Print at my Fine Art America shop by clicking on the my shop above right under Shops!
Prints as low as $42.00!


Thursday, April 25, 2019

Portrait in Oils - Step Three

Commissioned Portrait
Oil Paints
16 x 20

Baby MayLan

Portrait in Oils - Step Three:

In this step I worked some on the flesh tones and hands.  I was not happy with the way her fingers were coming along.  I'm still not 100% satisfied with her hands.  I will continue in my next sitting to work some more on the hands. 

I also worked on her arms and her face.  I am still working on these parts.  They are a WIP!

I also worked on her hair.  The hair is not to my liking just yet but everything is coming along well. 

I painted the first underpainting of the background - green.  Baby MayLan is sitting in a green field made up of many different shades of green and some wild flowers, which I will paint in another day. I am pleased so far.  


Portrait in Oils - Step Two

Commissioned Portrait
Oil Paints
16 x 20

Baby MayLan

Portrait in Oils - Step Two:
(See April 18th post for Step One).

Today I worked with the flesh tones.  The paint colors I used were:

* Naples Yellow + tiny drops of Burnt Sienna = flesh tone 
(which you may have to lighten or darken depending on the shade of Asian or Caucasin skin tones.)

*Cad Red Light + Titanium White = Pink
(then add tiny drops of pink to the flesh tone.)

For the shadows on the skin I used:

* Alizarin Crimson + Burnt Umber (Van Dyke Brown) 


This is a Work In Progress ("WIP") and the flesh tones and pink clothing will be still worked on until it reaches the saturation of color that I am looking for.  

Which Artist Paint Brush Should You Use?


Which Artist Paint Brush Should You Use?


In an article I read on DrawPaintAcademy.com by Dan Scott, I found this question answered and thought I would share it with all my blog subscribers and art readers.  

Dan Scott writes:
"Personally, I use paint brushes as follows:
  • For staining the canvas I use the largest flat or filbert brush I have.
  • For sketching the composition I use a medium sized round brush, or sometimes even a fan brush if I want a very rough landscape sketch.
  • For blocking in general colors and shapes I use a medium to large filbert.  Sometimes I will use a flat brush if the shapes are angular.
  • For adding detail I use smaller filbert and round brushes.  I also use the fan brush in certain situations, such as for painting leaves, grass or water.
  • For signing the painting and adding very fine details I use a small round brush."

(Reference:  DrawPaintAcademy.com by Dan Scott).  I enjoy this site and maybe you will too.  No, I do not get any free products or anything else for sharing this information on my blog.  I just think this is helpful information that my blog subscribers and art readers would enjoy.  

Wednesday, April 24, 2019

Come Visit - Saturday April 27th, 7 - 9 p.m. Houston, Texas


Come visit Winter Street Studio's 
at the Sawyer Yards in Houston, Texas!

I will be representing MFAH - Glassell Studio School of Art from
 7 - 9 p.m. this Saturday evening, April 27th, at the Winter Street Studio's.

Also visit the many many working artists studio's and see how they produce their work and sell their art.  You will see a most fascinating grouping of many different types of artists, who work in many different mediums, showing and selling their work.  If you haven't every been to Sawyer Yards you are really missing out! 

If you purchase art at participating studio's, a percentage of your sale will go to the scholarship fund of Glassell.  


Monday, April 22, 2019

Art Share

Art Share

Enhance Your Colors By Providing Their 
Opposites!

    Understanding the notion of opposites creates creating rich interesting color.  To make anything look fantastic in our art, especially color, it is crucial that we think of opposites. If you have a dark saturated color that is a cool color, try adjusting what is around that color or in the proximity, to be a color that is its opposite. . . in this case a color that would be very light, unsaturated and possibly slightly warm.  [Look at your color wheel].   If you can get in the habit of seeing what colors will enhance the colors you have placed in your art, the overall color in your art will become more sophisticated.  (from Color Tips for Artists, Tip 02, Art2Life)

    Hopefully I will remember to do this and maybe one day it will just come naturally to me!

Sunday, April 21, 2019

Palette Knife Painting with Acrylics

Palette Knife Art

Pretty Pear

Color Saturated Palette Knife Painting in Acrylics on Wrapped Canvas Board
  Ready to hang.  No frame needed.  

Size:  16 x 20

For Sale:  $110.00


(This price includes FREE SHIPPING and your art work
will be bubble wrapped for protection during shipping)!

BUY NOW WITH PAYPAL - CLICK ABOVE

Purchase a Print at my Fine Art America shop by clicking on the my shop above right under Shops!
Prints as low as $42.00!


Palette Knife painting is fun but very challenging! Palette knife gives a very painterly look to the art work.  I like it!  So in order to get your paint really thick first you mix the color you want and then you add a gel medium.  Below is a picture of the medium I chose and feel I was successful.  The more medium you add the thicker your mark making will be. 


Here is a close up showing the palette knife marks.


I hope you give this technique a try!

Thursday, April 18, 2019

Portrait in Oils - Step One

Commissioned Portrait
Oil Paints
16 x 20

Baby MayLan

Portrait in Oils - Step One:

I know that this is somewhat hard to see but it is my Step One painting with oils.  I first drew the portrait with a Conte pencil (red brown shade).  Next I added the blue gray underpainting.  Believe it or not we have some blue in our skin color, other than, of course, people of color who do not have blue undertones.  I 'scumbled' the undercoating, because to me, when the undercoating is just painted in the normal fashion it is just to flat for my liking.  

Next I painted what is referred to as 'lean' layer (vs 'fat' layer).  A 'lean' layer of paint is very thin.  The goal is to just block in some color.  I will most likely add a second 'lean' layer and then finally a 'fat' layer which will be a fully loaded brush of paint!


Once this dries, which will take a few days, I will paint the skin.  Mixing the skin tones will be somewhat challenging because this is a babies skin which is smooth and beautiful and has not been exposed to the outside elements.  Until next week!

Tuesday, April 16, 2019

Art Tip - What to do . . . . .

What to Do with All that Left Over Paint


I'm the person who mixes large globs of paint!  Are you too?  I do this becasue I'm so afraid of running out of that beautiful color I just mixed!  I'd never get that exact color again!  

Oh, before I go on. . . . the purpose of mixing your colors is that no one else in the whole wide world will be able to use that color in their painting which will make your work original.  Sure, do I occassionally use straight from the tube - yes, and so should you if that's your thing, but I have learned that mixing your colors is so much fun!

Ok, so back to mixing large globs of paint and then not needing to use it all:  

1.  You can store it in jars bought from your local hobby store or even those jars that come with your food delivery, as long as they seal tightly.  Acrylics stored this way should last for a few months.

2.  The new way I learned last week, which I can't wait to share with you, is such a cool idea.  I was chatting with one of my art instructors - Lucinda Cobley, who teaches at The Art League Houston,  about this dilemma of throwing away so much paint.  "No, no, no," she says . . . "paint all that paint left on your palette (even the smallest amounts) onto a piece of art paper.  Later when you do a collage, you will have all these pretty colored painted papers that you can cut or tear into interesting shapes to add to you collages! " 

Brilliant, I say, just simply brilliant! 


My Yellow Daisy Painting


My Yellow Daisy

Color Saturated Acrylics on Wrapped Canvas Board
  Ready to hang.  No frame needed.  

Size:  8 x 10

For Sale:  $55.00


(This price includes FREE SHIPPING and your art work
will be bubble wrapped for protection during shipping)!

BUY NOW WITH PAYPAL - CLICK ON RIGHT HAND COLUMN

Purchase a Print at my Fine Art America shop by clicking on the my shop above right under Shops!
Prints as low as $42.00!


Saturday, April 13, 2019

After David Hockney....


David Hockney's iArt, British Painter
(drawn on his iPad)
Acrylic


Saturated Painting in Acrylics on Wrapped Canvas Board
  Ready to hang.  No frame needed.  

Size:  16 x 20

For Sale:  $70.00


(This price includes FREE SHIPPING and your art work
will be bubble wrapped for protection during shipping)!


BUY NOW WITH PAYPAL - CLICK ABOVE


Purchase a Print at my Fine Art America shop by clicking on the my shop above right under Shops!

Prints as low as $42.00!


(After David Hockney)


Tuesday, April 9, 2019

Your Artistic Path . . . .Art Chatter

Discover Your Best Self

"When Alice fell down the rabbit hole, she asked the Cheshire Cat, "Would you tell me, please, which way I ought to go from here?"  "That depends a good deal on where you want to get to," said the Cat.  "I don't much care where . . ." said Alice.  "Then it doesn't matter which way you go," said the Cat.  " . . .  so long as I get somewhere," Alice added as explanation.  "Oh, you're sure to do that," said the Cat, "if you only walk long enough." - Author: Louis Carroll.

OH MY GOSH - I don't know about you as an artist, but I fight with this almost on a daily basis!  Yes, I want . . . .  (fill in the blank) and then, I would just head out there on my artistic path blind - taking no heed to what my dreams about art were.  

WHY?  You know, I really have no idea why we do this - fear maybe.  

But last winter I tackled a small piece of this issue.  I wrote an artist statement (with help from a pro of course - took a workshop at my local art league) and I am sort of, kindda maybe, heading in the right direction.  No, I think yes, I am heading in the right direction.  But progress is slow because there is so much 'other' life to be lived.  

Let us take the time to sit down, and think about this . . .  what do I want my artistic path to be?  And then let us each figure out how to get there!  Let's read articles from professionals who are doing what we want to do, read books, find a mentor (an on line mentor works!) and then write!  Yes, write - scribble it (ohhh cute - that's part of my blog name!).  Yes, let us have a dedicated note book (from the dollar store - or a fancy hoop la one), just write . . .  write what?  Write all our ideas, all our art dreams . . . 

Maybe together we can make our dreams come true.  Let's not be an Alice heading just out there . . . . . 


Monday, April 8, 2019

Yes, you CAN buy my prints!

Prints Available


This blog sells originals.

To purchase a PRINT of the original please go to FineArtAmerica.com and enter my name: Theresa Honeycheck, or even easier, just click the Fine Art America button on the right side of this blog under "My Shops."

Yes, Fine Art America takes PayPal and all other forms of credit card payments.  

A BIG SHOUT OUT - to my Louisville, KY customer who purchased a 16 x 20 print of Geraniums in a Pot - watercolor.  Whoo Hoo!  Thank you very much!


Self Portrait using Golden Open Acrylics

Self Portrait

16 x 20 

Not for Sale - however - I will do commission work, 
so send me an email if you are interested and we can talk! 

 theresahoneycheck@gmail.com


This is the first time I followed the Great Master's technique of doing a light to the touch under painting.  I chose burnt umber.  What this did for me was provide me with my midtones in the painting and I did not have to worry about painting in all the laugh lines or midtones areas!  Its a wonderful technique that you (if you are a painter) should try. 

Some viewers have commented on how I painted my frameless glasses - I viewed many famous artists work to see how others painted frameless glasses.  I found a painting by John Singer Sargent (amazing artist by the way) and followed his style of just slightly showing an indication that the frameless glasses are there.  I loved the technique and will use it again.  

Thursday, March 28, 2019

Sharing my good news!

Sharing my Good News!

I was contacted today by a curator for RAW - an independent arts organization that hosts events across US and around the globe!  

She found my profile while browsing for Houston artists and thinks I will be an excellent fit for their show - and is wondering if I might be interested in participating for Houston's IMPACT showcase coming up this May!  

Wow! I'm waiting on more information and details. Just call me "blown away!"

Monday, March 25, 2019

Painting Like the Old Masters!

Painting Like the Old Master's

Old Master's Technique
with acrylics and 
Matte Medium to thin your paint (no water ever!)

      The deep, rich, velvety darks were 
    achieved by Masters such as Rembrandt by 
     applying many layers of transparent paint.

I started by lightly painted an under painting.  I used burnt umber. I mixed three color piles of paint- light, dark, and most darkest.  When painting this layer, I focused on the details of my painting reference checking for the light and dark areas. 

This layer will determine the proportion of light and shadow in your composition. When painting this underpainting the paint should be almost as thin as watercolors. However, there are always exceptions to the rules - I chose to paint mine slightly thicker than watercolors because it is my hope that my underpainting will show through my layers of transparent paint giving almost an illumination.  

Sketch your picture reference onto your canvas. I have found that using pastel chalk to sketch works best for me.  The pastel will mix with your paint easily.  If you have an occasional pastel mark showing it actually will add to your painting.  


 Next paint your picture making sure to paint the lights, darks, and most dark areas.  Try to blend each area into one another so that there are no hard lines.  Oh by the way, I always mix my acrylics with a matte medium NEVER WATER, because the water dilutes the stickiness of the paint to your canvas.  Use a matte (of if you prefer glossy) medium to mix with your acrylics paint.  However, this can be quite tricky - too much medium will cause your paint to be tacky, so start off with small dabs of the medium in your paint.  If you find it is not moving (flowing) as you like add another small dab.


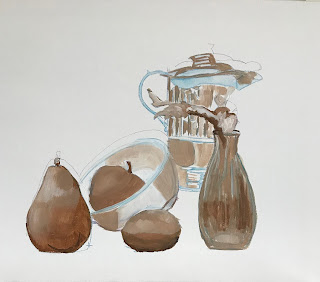
This is my still life set up that I will begin painting with color.  Notice that I have painted lights, darks and darkest.  

The next step is fairly easy.  Paint in the complete background.   Be sure to mix plenty of paint if you have a large area like I do.  It is better to mix plenty of paint and have some left over than to run out and try to mix another batch the same hue.  


I mix a huge batch because far too often I have run out of paint before I am finished with an area, and I can never quite match the hue again.  When I am finished, I just scoop up that extra paint and put it into a container that has a cover that provides a tight seal.  My experience is that saved acrylic paint like this has kept for months. 


Once the paint has dried completely,  I will start the next layer.  This is called glazing - or painting with transparent paint.  I prefer glazing.  The technique is quite simple.  Mix your paint color (remember to add your medium).  Pull some paint aside and mix it with another squirt of medium making your paint very thin almost watery.  This is called your glaze. 

Glaze your objects one at a time.  When each object is completely dry - put on another layer of glaze, again and again and again until it reaches the level of color you desire.  

I will share my painting with you - IT IS A WORK IN PROGRESS!  I did start to paint in my background.  I still have to work on my objects reshaping and adding more glaze, and make some shadows and work on the drapery some.  Like I said a work in progress. 


Learning this technique was not only intresting but a lot of fun.

You can view my completed painting in another post called Rainy Day Still Life Painting and Abbreviated Rainy Day Still Life Painting.  


Sunday, March 24, 2019

Thank you!

A Heartfelt Thank You 
to all my viewers and
customers!

This blog would not be possible without you.  I sincerely appreciate your stopping by my page and enjoying my small creative corner of a very large world!

Thank you!  Leave me a comment or subscribe to my page by registering your email.  You will receive my posts as they are made.  Now isn't that just the coolest! 

Theresa!